
A driveway pour usually goes wrong long before the concrete arrives. The common failures – cracking, ponding water, soft edges, and low spots – nearly always start with poor ground prep, weak formwork, or ordering the wrong amount. If you want to know how to pour concrete driveway sections properly, start by treating it as a structural job, not just a surface finish.
For homeowners, builders, and small contractors, the goal is simple: get a clean, durable slab that drains well, takes vehicle loads, and does not leave you paying for wasted material. That means planning the base, thickness, reinforcement, joints, and pour sequence before the first barrow or chute is in position.
How to pour concrete driveway without early failures
A concrete driveway needs more than a flat patch of wet mix. It needs support underneath, consistent slab depth, and enough control over the pour to keep pace from start to finish. If one part of the slab is thin or the base is soft, that is where trouble tends to begin.
For most domestic driveways, a slab thickness around 100mm is common, but that depends on the ground conditions and the vehicle loads. If vans, heavier vehicles, or frequent turning movements are expected, you may need a stronger design, thicker slab, or a higher concrete grade. This is where many DIY pours become expensive – not because concrete is difficult, but because guessing replaces specification.
Drainage matters just as much. A driveway should fall away enough to shed water without creating an awkward slope. If water sits on the surface, it can stain the slab, weaken the finish over time, and become a slip issue. Build the fall into the sub-base and formwork, not by trying to fix it while finishing.
Start with excavation and sub-base
Remove all topsoil, roots, loose fill, and any soft material. Concrete only performs as well as the layer beneath it. If you pour onto unstable ground, the slab may settle unevenly and crack under traffic.
Once excavated, install a compacted sub-base. Crushed stone or well-graded hardcore is typically used, compacted in layers rather than dumped in one lift. This gives the slab proper support and helps with drainage. If the site has weak spots, deal with them before moving on. It is cheaper to fix the formation now than repair a failed driveway later.
On some sites, a sand blinding layer or membrane may be used depending on soil condition and design. It depends on the application. A basic domestic driveway and a more demanding access area are not always built the same way.
Set the formwork and levels properly
Formwork has one job: hold the slab to line, level, and thickness while the concrete is placed and compacted. If the forms move, bow, or sit out of level, the finished driveway will show it immediately.
Use strong timber or steel forms fixed securely with stakes. Check widths, diagonals, and finished levels before the pour starts. This is also the moment to confirm your falls and where water will run. A few millimetres wrong at the form edge can become an obvious drainage problem across the slab.
If the driveway meets a garage, gate threshold, or pavement, set those interfaces carefully. You do not want a proud edge, a trip point, or water draining towards the house. Good concrete work is often good level control.
Reinforcement, joints, and thickness
Not every driveway uses the same reinforcement detail, but many benefit from steel mesh or fibre-reinforced concrete depending on design and loading. Reinforcement helps control cracking behaviour, but it does not replace proper sub-base or slab thickness. That is a common misunderstanding.
If mesh is used, it must sit in the slab correctly, not flat on the ground. Chairs or spacers keep it at the right height so it can do its job. If it ends up at the bottom after the pour, it adds very little value.
Plan your joints before concrete arrives. Concrete will crack somewhere. The job is to encourage cracking where you want it, using control joints at suitable spacing. Expansion joints may also be needed where the driveway meets fixed structures. Joint layout should match the slab shape and avoid awkward narrow panels that tend to crack unpredictably.
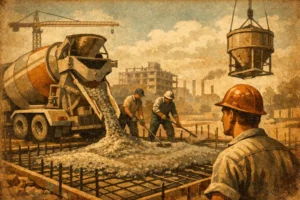
Ordering the right concrete for the job
This is where practical site control makes a real difference. A driveway pour needs a mix that suits the slab thickness, reinforcement detail, weather, and placing method. Too wet, and the surface can weaken. Too stiff, and you will struggle to place and finish it efficiently.
For many domestic and light commercial driveway pours, ready access to the correct grade and volume matters more than people expect. Over-order and you pay for waste and disposal. Under-order and the pour becomes disjointed, which is never ideal on a driveway slab.
On-site mixed konkrit isipadu is useful here because the quantity can be adjusted as the job progresses, and mix design can be matched to the application. For sites in Kuala Lumpur and surrounding areas, this gives contractors and homeowners more control when access, weather, or slab dimensions are not perfectly predictable. You only pay for the concrete you use, which is often a better fit for driveway work than ordering blind.
Placing the concrete
When the concrete arrives, work steadily and keep the pour continuous. Place it as near to final position as possible. Excessive shovelling across the slab can separate the mix and slow the crew down.
Spread the concrete evenly between the forms and bring it to level with a straightedge or screed. Compact it properly, especially around edges and any reinforcement. Voids at the sides are a common weakness on driveway slabs because those edges take abuse from tyres and foot traffic.
Do not add water on site just to make the mix easier to handle unless it is approved as part of the mix control. Extra water may seem helpful in the moment, but it often reduces strength and increases shrinkage. That short-term convenience can become a long-term repair bill.
Finishing the surface
A driveway finish should prioritise durability and slip resistance over appearance alone. After screeding, use a bull float or hand float as needed to close the surface and remove ridges. Then wait. Finishing too early, while bleed water is still present, can ruin the top layer.
For most driveways, a brushed finish is the practical choice. It gives texture, better traction in wet conditions, and a clean, professional look. A very smooth finish may look smart on day one, but it is less forgiving under rain, tyre movement, and regular use.
Edges and joints should be finished neatly, but avoid overworking the slab. Too much trowelling can bring excess paste to the surface and increase the chance of dusting or surface weakness. The best finish is usually the one done at the right time, not the one fussed over the longest.
Curing is not optional
If you skip curing, you undercut the whole job. Fresh concrete needs to retain moisture long enough to gain strength properly. Hot weather, wind, and direct sun can dry the surface fast, which raises the risk of shrinkage cracking and weak top finish.
Use a curing method suited to the site conditions, whether that is a curing compound, sheeting, or damp coverings. Protect the slab from premature traffic as well. Foot traffic too early can mark the surface, and vehicles too soon can damage edges before the concrete has developed enough strength.
The exact wait time depends on the mix, weather, and loading, but patience here pays off. A driveway that is cured properly usually looks better and lasts longer.
Mistakes that cost the most
The expensive mistakes are rarely dramatic. More often, they are small decisions that stack up: poor compaction, weak edges, bad falls, no joint plan, or ordering a guessed volume. That is why driveway pours reward preparation more than improvisation.
Another common issue is trying to save money by making the slab thinner than it should be. Thin concrete over a weak base is false economy. You may save at the pour stage and spend more on cracking, patching, and replacement.
If access is tight, weather is turning, or the driveway shape is awkward, get support before pour day. A practical concrete supplier can help you match quantity and mix to the actual site instead of forcing the job to fit a standard order. Kota Konkrit does this with fresh on-site mixed concrete and pay-for-what-you-pour supply, which removes a lot of the usual waste and guesswork.
A good driveway does not come from luck or from making the mix wetter and hoping for the best. It comes from proper prep, controlled placing, and knowing where the slab can fail before it does. Get those parts right, and the concrete has every chance to do its job for years.

